Proper plumbing installation is crucial for maintaining clean and crystal-clear waters when setting up a pool. An efficient pool plumbing system ensures adequate filtration and sanitisation and helps preserve the longevity of the pool’s interior and equipment. This comprehensive guide will walk you through installing plumbing in a pool, from understanding the benefits to step-by-step instructions.
The Benefits of Installing Pool Plumbing
A well-designed pool plumbing system offers numerous benefits that contribute to your pool’s overall maintenance and efficiency. Investing in quality pool plumbing allows you to enjoy lower maintenance costs, improved energy efficiency, and a pool that is always ready for a refreshing swim. Let’s take a closer look at some of the key advantages:
Enhanced Filtration and Sanitization
A properly installed pool plumbing system ensures water is effectively filtered and sanitised. This helps in removing debris, bacteria, and other contaminants, resulting in clean and healthy water for you and your family to enjoy.
Efficient Water Circulation
Efficient water circulation is essential for maintaining the cleanliness and quality of your pool. A well-plumbed pool ensures that water is adequately circulated, preventing stagnant areas and maintaining consistent temperature and chemical distribution throughout the pool.
Lower Maintenance Costs
With an efficiently planned plumbing system, you’ll save money on upkeep over time. A thoughtful design incorporating proper filtration and circulation helps minimise the accumulation of dirt and algae, thereby decreasing the necessity for frequent cleanings and chemical interventions.
Energy Efficiency
An efficient pool plumbing system can contribute to energy savings. You can optimise energy consumption and minimise operational costs by selecting the right pump with the appropriate horsepower for your pool’s volume.
Pool Plumbing Components
To understand the installation process, let’s take a closer look at the various components that make up a pool plumbing system:
Skimmer
The skimmer is a crucial component of the pool plumbing system as it acts as a pre-filter, capturing large debris before it sinks to the bottom. It helps in keeping the pool’s surface clean and sparkling.
Suction Lines
Suction lines are underwater conduits transporting water from the skimmer and main drain to the pump. These pipes are typically made of durable PVC to withstand pressure and the elements.
Pump
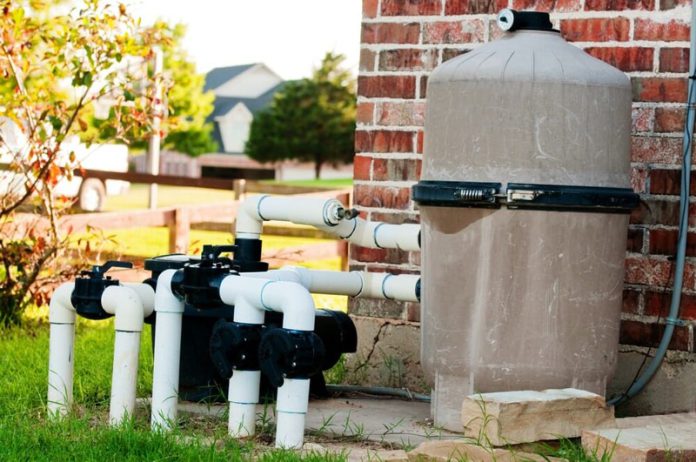
The pump is the heart of the pool plumbing system and is responsible for moving water through the filter and back into the pool. It is essential to choose a pump with the correct horsepower to accommodate the size of your pool.
Filter
The pool filter is critical in removing microscopic debris from the water. Different types of filters are available, such as sand, cartridge, or diatomaceous earth, each with its own merits and maintenance requirements.
Return Lines
After filtering the water, it is returned to the pool through the return lines. The strategic placement of these lines influences the overall water circulation pattern, ensuring an even distribution of clean water.
Return Fittings
Return fittings, or jet fittings, are where the filtered water re-enters the pool. Properly aimed fittings facilitate water movement, aiding in the distribution of chemicals and heat.
Main Drain
The primary drains within the pool are situated towards its lower region, where they significantly contribute to the aquatic environment’s overall functionality by facilitating water circulation from the depths, ensuring a consistent temperature, and dispersing clean water throughout the pool.
How to Install Plumbing in a Pool: Step-by-Step Guide
Now that we are familiar with the benefits and components of a pool plumbing system, let’s dive into the step-by-step process of installing plumbing in a pool. It is important to note that pool plumbing installation is a complex task that requires precision and patience. If you are not confident in your abilities, it is recommended that you seek the assistance of a professional plumber.
Step 1: Design the Layout
The first step in installing pool plumbing is to plan the layout carefully. This includes determining the ideal placement of the skimmer, main drain, and return jets for efficient water circulation. Consider factors such as the size of the pool, its shape, and desired water flow pattern when designing the layout.
Step 2: Excavate and Lay Pipe
Once the layout is planned, it’s time to start the physical installation. Excavate trenches for the plumbing pipes, ensuring they are deep enough to accommodate them without compromising the pool’s structural integrity. Lay the pipes according to the design, creating gentle slopes to facilitate water flow.
Step 3: Install the Skimmer and Drains
With the trenches in place, it’s time to install the skimmer and main drains. Follow the manufacturer’s instructions to attach and seal these components securely. Proper installation of the skimmer and drains is crucial for preventing leaks and ensuring efficient water intake.
Step 4: Connect to the Pump and Filter
Next, connect the suction and return lines to the pump and filter. Use PVC glue and primer to create a secure and leak-proof connection. It is essential to carefully follow the instructions given by the manufacturer for proper installation and to ensure that the connections are tight and sealed.
Step 5: Install Return Jets
Install the return jet fittings into the pool walls according to the design. Make sure they are tightly sealed and adequately aimed to promote effective water circulation. Properly positioned return jets will help distribute chemicals and heat evenly throughout the pool.
Step 6: Pressure Test
Before filling in the trenches, it is crucial to conduct a pressure test to check for leaks in the plumbing system. Close off all openings and apply pressure to the system using a test pump or air compressor. Inspect for any signs of leaks and make the necessary repairs before proceeding.
Step 7: Final Touches
Once the pressure test is booming and there are no leaks, it’s time to complete the installation. Backfill the trenches carefully, ensuring that the pipes are adequately supported and protected. Set up the pump, filter, and any additional equipment according to the manufacturer’s instructions. Make final connections and ensure everything is secure.
Step 8: Fill and Start the System
With the installation complete, it’s time to fill the pool with water and start the system. Monitor the water level closely during the filling process and check for leaks or abnormal behaviour. Once the pool is filled, start the pump and filter system and check for proper operation. To ensure optimal performance, you should make any necessary adjustments promptly.
Conclusion
Installing plumbing in a pool involves meticulous planning and implementation to guarantee optimal functionality and safety. A thoughtfully designed plumbing system keeps the water clean and sanitary and promotes smooth circulation within the pool area. To achieve a flawless installation, adhere to the detailed instructions provided in this article. You can revel in uninterrupted swimming and leisure time in your newly established pool paradise with proper attention to detail and potential assistance from a qualified plumber when necessary.


